
Creating a custom pose
- sleighbelle

- Dec 28, 2018
- 3 min read
Updated: Jan 11, 2019
Now, after creating a custom face, it doesn't seem that hard, doesn't it?
If you haven't read that post, do read it before this! This post would probably make more sense for first timers :)
Thus, welcome to today's blogpost on:
Editing
Applications required: maplestory.design character design saved in layers & editing software of choice.
In general, any editing software that can provide the user to crop, colour, draw, etc. would be a good starter. Even Microsoft Paint could be of a great use.
Applications such as Keynote can also be handy if you're in need of a simple animated text. I will go into details on that later in the post.
To create your character, open up maplestory.design and create your character of choice. Make sure to save them in both the normal and layered spritesheet.
Tutorial on how to create your character: https://youtu.be/vFjsUB-Su9c
Poses/ Faces- you can create them yourselves by arranging the various body parts, or simply download pre-made poses provided by the lovely artists on Deviantart.com. Simply search for 'maplestory custom poses' or 'maplestory custom poses' and a variety of options will appear.
Here's a screenshot of what the search might look like:

They're usually free to use, make sure to read the description and credit the artist!
From here, you can start on editing your custom pose/ face.
I usually use either Clip Studio Paint, Paint.Net, or Microsoft Paint for this step.
Today I'll be using Clip Studio Paint.
The first step is to open the base character, or custom pose.
Make sure to import or copy the layers
For the tutorial's sake, we'll use a custom pose made by IloveeeuPikachu (available on Deviantart).
Link: https://www.deviantart.com/iloveeupikachu/art/Custom-Pose-Maplestory-349790292
[Hopefully this way, it'd be easier to follow along!]

In your character's folders, look for 'default' or select your desired facial expression and stance.
In my case I'll make it simple by choosing 'default' and 'stand1_0'. Because the body of the character standing is the most similar to this pose's stance (thus lesser editing is required!).

Now, import the layers individually and layer them on top of each other, corresponding to what should be on the top and bottom. For example, the back hair should be at the last layer. The file title would probably be something along the lines of 'L1,R1,C1,hairBelowBody,visible,normal,255'.
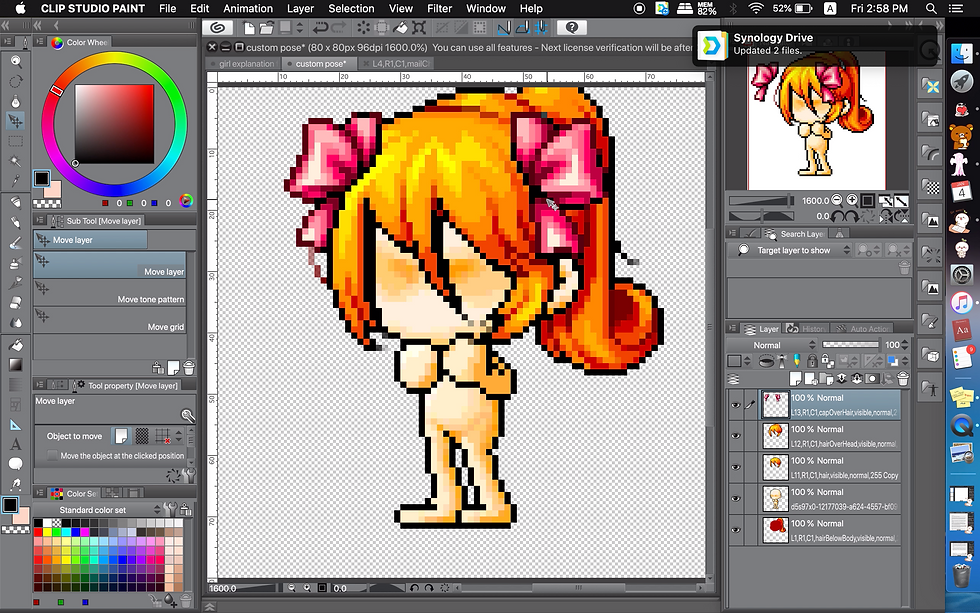
As the canvas size may differ from the original base character, you might have to move the components around to fit it in its right place. Take note that sometimes, certain character features, such as hair or clothing can be a tad bit bigger than the custom pose's canvas, so do expand it!
Now, to edit the clothing in, should be an easy task- except for the arms.
For the body, simply crop out parts that shouldn't be there. See what you think fits.
The arms are the tricky part. Here you can colour pick from the sleeve, and fill it in yourself.
For this process, it's better to use Paint.Net as it's friendlier towards pixel art.

And once you're done with that, save the picture and there you have it! Your own custom pose.

And that's how you edit a character's body pose. Isn't it easy?
Now you're equipped with skills to edit better!
Watch the video linked above for a better explanation, if this isn't clear-cut for you.
To put them into a scene, download or create your own background and place them in.
If the blogpost doesn't help you understand the process well enough,
here's the link to the video tutorial!
https://www.youtube.com/watch?v=G3cPm3YzaMQ
Applications recommended (both free & paid)
Windows: Microsoft Paint, Paint.Net, FireAlpaca, Krita, Clip Studio Paint
Mac: Keynote, FireAlpaca, Krita (works better on windows), Clip Studio Paint
As always,
good luck, and all the best! ♡
Do share your designs with me on my tumblr~


Comments